


None
Most users ever online was 301 on Thu 21 Oct 2021 - 11:24
by redboat219 Tue 27 Sep 2022 - 11:43
» Land Rover Defender D90 photos and details only (picture intensive!)
by babyboy Fri 25 Jun 2021 - 16:39
» [Offroad Bashing and Rally] Offroad Bashing and Rally at Tampines Track 12 Jan 2020 - 0900hrs
by boolean21 Sat 11 Jan 2020 - 10:15
» [Scale Trail] Woodgrove Ave - Sunday 20 Oct 2019 0900hrs
by boolean21 Sat 19 Oct 2019 - 16:31
» vHOBBY RC videos
by CraftRC Fri 21 Jun 2019 - 21:32
» Suzuki Samurai 3D Printted project
by CraftRC Sat 4 May 2019 - 18:39
» WTS : Redcat Gen 7 Pro
by staypuft Mon 7 Jan 2019 - 11:31
» Hello all! Dan here
by csd8888 Fri 5 Oct 2018 - 8:27
» [Offroad Trails] Offroading at Tampines Quarry 16 Sep 2018 - 0900hrs
by boolean21 Sat 15 Sep 2018 - 18:41
» [Scale Trail] Woodgrove Ave - Sunday 12 Aug 2018 0900hrs
by boolean21 Sat 11 Aug 2018 - 22:51
» [Trail and Bash!] Woodgrove Ave - Sunday 22 Jul 2018 0900hrs
by boolean21 Sat 21 Jul 2018 - 19:39
» [Scale Trail] Woodgrove Ave - Sunday 01 Jul 2018 0900hrs
by boolean21 Sat 30 Jun 2018 - 20:39
» wts hobbywing esc + motor
by kelvintan_hc Thu 28 Jun 2018 - 15:36
» Axial roll cage crash
by CraftRC Fri 1 Jun 2018 - 20:16
» Jeep cherokee XJ crawling
by CraftRC Sat 26 May 2018 - 21:54
» Jeep cherokee XJ crawling
by CraftRC Sat 26 May 2018 - 21:54
» Extreme Rock Crawler Axial Wraith
by CraftRC Tue 8 May 2018 - 17:35
» [Scale Trail] Woodgrove Ave - Sunday 06 May 2018 0900hrs
by boolean21 Sat 5 May 2018 - 17:14
» Cab Land Rover Defender
by CraftRC Fri 4 May 2018 - 17:41
» Cab Land Rover Defender
by CraftRC Fri 4 May 2018 - 17:41
| boolean21 | ||||
| RTECH | ||||
| gionata78 | ||||
| laneboysrc | ||||
| oceanic | ||||
| Marpek | ||||
| babyboy | ||||
| ShaiAX55 | ||||
| Wrigleys | ||||
| Holdencars |

LANE Boys RC's Tamiya XR311 build
Page 2 of 3 •  1, 2, 3
 ![]()
Re: LANE Boys RC's Tamiya XR311 build
![]() by RTECH Mon 24 Dec 2012 - 16:42
by RTECH Mon 24 Dec 2012 - 16:42

RTECH- Crawler
- Posts : 2376
Join date : 2011-08-22
Age : 52
Location : Hougang
A jumpsuit for the driver
![]() by laneboysrc Sat 9 Mar 2013 - 0:47
by laneboysrc Sat 9 Mar 2013 - 0:47
Since I made the steering wheel movable I need the arms of the driver to follow the steering wheel. I first thought of adding hinges to the plastic, but abandoned the idea. I made hinges before for our Dingo and I am not pleased with how it turned out.
Studying how others solved the issue I found that real cloth provides the flexibility to keep the hands on the steering wheel. So I needed to make a suit for my driver.
Before Christmas I acquired a 2nd hand sewing machine from Cash Converter. It was cheap, but turned out to be a lemon. When I cleaned the machine after bringing it home I discovered that there was a cockroach nest inside the foot pedal. I was not amused
Then I couldn't get the machine working for quite a while. It didn't help that I never used a sewing machine before, so at first I thought that I did something wrong. After a while I realised that the machine was not working properly. Luckily after a bit of Googling I found a service manual of a similar machine to the one I have. Last weekend I checked a few things and found that an alignment was out. It was easy to fix and now the machine is finally working as intended. Time to make a suit
I found a jumpsuit pattern for a 1/6 scale G.I. Joe figure on Flickr. Since the XR311 is 1/12 I figured that the pattern would fit if I reduced its size by 50%. I started with the main pieces of the jumpsuit.

First test fit:
The legs fit well, but the upper body was too short. So I cut new pieces of cloth, but this time I increased the upper body area by 1cm. Now it fits well:

After sewing the main parts of the suit together I made one arm.

It was a good idea to make a hem straight away on the sewing machine. I neglected to do that on the feet and had to do it manually at a later point, which doesn't look as good as the machine stitches.

Test fitting the arm: looks great! The second arm went smooth as well.

With the major parts of the suit complete up next was the tedious task of cleaning up all the hems. This had to be done with hand sewing as there is no way to get such small pieces in the machine. I've never sown before, but after watching a few YouTube videos it was a breeze.

Test fit: The upper body looks a bit too wide for the small figure due to the shoulders on the suit being too wide. Some adjustment needed... I narrowed the back of the suit a bit and now everything fits better.

I am very pleased with the outcome, it was a difficult job and my first attempt at sewing.
All in all it took me 5 hours to make this jumpsuit.

laneboysrc- Crawler
- Posts : 877
Join date : 2012-05-21 -

Re: LANE Boys RC's Tamiya XR311 build
![]() by boolean21 Sat 9 Mar 2013 - 1:27
by boolean21 Sat 9 Mar 2013 - 1:27
nice sewing skills bro.

boolean21- Crawler
- Posts : 5035
Join date : 2011-08-18
Location : Deep inside the Jungle -

oceanic- Moderator
- Posts : 1212
Join date : 2012-03-21
Location : N1°24.229' E103°48.094 -
Re: LANE Boys RC's Tamiya XR311 build
![]() by laneboysrc Sat 9 Mar 2013 - 8:23
by laneboysrc Sat 9 Mar 2013 - 8:23
oceanic wrote:Nice! U from project runway?
laneboysrc- Crawler
- Posts : 877
Join date : 2012-05-21 -
Anyone know this guy?
![]() by laneboysrc Fri 15 Mar 2013 - 21:48
by laneboysrc Fri 15 Mar 2013 - 21:48
I started with several thin coats of Tamiya flesh. Here is after the first coat. It does not fully cover the primer yet.
While the face is drying it is a good time to paint other parts of the figure, such as the boots. It took in total four layers until the brown covered neatly.

Here is the face after three thin coats of flesh. The color is now relatively even and covering well.

We start with shading the eyes and the area under the cheek bones with a very faint mixture of flesh and blue. The paint was very much thinned out to give just a hint of color.

The area under the eyes and the nose receive a red-tinted skin color. It turned out a bit too strong as seen here, later I toned it down with a wash of pure flesh color.

The eyes have been painted white, mixed with a tiny bit of black to ensure they don't look like ghost eyes. The pupils have been painted with brown, as have the eye brows and the moustache. The eye brows are a bit to narrow here, I widened them later.

The upper body, which will be partly visible underneath the jumpsuit, received three layers of blue. After that a thin black wash was applied to highlight the recessed areas and make it look more 3-dimensional.

The inner pupils have been painted black and a tiny white reflection dot was painted in for a realistic look. The moustache and eye brows received a bit of grey color for ageing. The chin and cheeks where washed with a very thin mixture of blue, white and black to look like an afternoon-beard.

Painting the hair was difficult as the figure has very little detail in that area. I started with multiple layers of brown, then added grey and painted thin streaks of black and brown on top to make it look like streaks of hair. Not fantastic, but decent.

The head was mounted to the body with epoxy. When inspected close up it is not so great ...

... but when viewed from a normal viewing distance it looks quite neat!
The eyes should have been closed a bit as he looks like a bit

thanks for viewing, Werner
laneboysrc- Crawler
- Posts : 877
Join date : 2012-05-21 -
oceanic- Moderator
- Posts : 1212
Join date : 2012-03-21
Location : N1°24.229' E103°48.094 -
boolean21- Crawler
- Posts : 5035
Join date : 2011-08-18
Location : Deep inside the Jungle -

slow- Crawler
- Posts : 1007
Join date : 2011-08-24
Location : West Mountain
babyboy- Crawler
- Posts : 721
Join date : 2011-09-28
Liew- Crawler
- Posts : 580
Join date : 2011-08-23
laneboysrc- Crawler
- Posts : 877
Join date : 2012-05-21 -
Done. Almost.
![]() by laneboysrc Sat 16 Mar 2013 - 14:01
by laneboysrc Sat 16 Mar 2013 - 14:01
Last night I applied a coat of flat clear to the figure. This morning I dressed the guy up and glued him into the car with epoxy. I glued the hands and arms directly to the steering wheel with medium thickness CA glue. The arms slide in the coat, they are not attached to it.
It looks decent and works great when the steering wheel is moving. I am very chuffed


thanks for viewing, Werner
laneboysrc- Crawler
- Posts : 877
Join date : 2012-05-21 -
Re: LANE Boys RC's Tamiya XR311 build
![]() by boolean21 Sat 16 Mar 2013 - 14:10
by boolean21 Sat 16 Mar 2013 - 14:10
boolean21- Crawler
- Posts : 5035
Join date : 2011-08-18
Location : Deep inside the Jungle -
Clean build done!
![]() by laneboysrc Sat 16 Mar 2013 - 20:37
by laneboysrc Sat 16 Mar 2013 - 20:37
Now it needs to get dirty as in its current state it does not look nice: too clinical. I still need to watch a few videos on how to do what I envision, but by end of next week it should be all gunked up and ready for its first video shoot.
Here are a few beauty-shots from the "golden hour" this afternoon:


laneboysrc- Crawler
- Posts : 877
Join date : 2012-05-21 -
100.000 miles later ...
![]() by laneboysrc Mon 18 Mar 2013 - 22:06
by laneboysrc Mon 18 Mar 2013 - 22:06
I used the Tamiya Weathering Master kit "B" with "soot" and "snow" (to make the flared wheel arches a bit grey-ish like worn plastic). Very easy to use.

I managed to mess up the windshield though as I forgot to mask it off when sealing the car with flat clear.

At the engine at the back the muck is even stronger.

That's it. Done. Finished. Now I just need time and a nice day at Woodgrove for a running video. Stay tuned!
laneboysrc- Crawler
- Posts : 877
Join date : 2012-05-21 -
Re: LANE Boys RC's Tamiya XR311 build
![]() by oceanic Tue 19 Mar 2013 - 7:42
by oceanic Tue 19 Mar 2013 - 7:42
oceanic- Moderator
- Posts : 1212
Join date : 2012-03-21
Location : N1°24.229' E103°48.094 -
Re: LANE Boys RC's Tamiya XR311 build
![]() by Marpek Tue 19 Mar 2013 - 9:38
by Marpek Tue 19 Mar 2013 - 9:38
laneboysrc wrote:After having finished the jumpsuit it was time to give the figure some color.
I started with several thin coats of Tamiya flesh. Here is after the first coat. It does not fully cover the primer yet.
While the face is drying it is a good time to paint other parts of the figure, such as the boots. It took in total four layers until the brown covered neatly.
Here is the face after three thin coats of flesh. The color is now relatively even and covering well.
We start with shading the eyes and the area under the cheek bones with a very faint mixture of flesh and blue. The paint was very much thinned out to give just a hint of color.
The area under the eyes and the nose receive a red-tinted skin color. It turned out a bit too strong as seen here, later I toned it down with a wash of pure flesh color.
The eyes have been painted white, mixed with a tiny bit of black to ensure they don't look like ghost eyes. The pupils have been painted with brown, as have the eye brows and the moustache. The eye brows are a bit to narrow here, I widened them later.
The upper body, which will be partly visible underneath the jumpsuit, received three layers of blue. After that a thin black wash was applied to highlight the recessed areas and make it look more 3-dimensional.
The inner pupils have been painted black and a tiny white reflection dot was painted in for a realistic look. The moustache and eye brows received a bit of grey color for ageing. The chin and cheeks where washed with a very thin mixture of blue, white and black to look like an afternoon-beard.
Painting the hair was difficult as the figure has very little detail in that area. I started with multiple layers of brown, then added grey and painted thin streaks of black and brown on top to make it look like streaks of hair. Not fantastic, but decent.
The head was mounted to the body with epoxy. When inspected close up it is not so great ...
... but when viewed from a normal viewing distance it looks quite neat!
The eyes should have been closed a bit as he looks like a bit. There is always room for improvement.
thanks for viewing, Werner
I dont know this guy...but he resembles my brat's driver...maybe his old man with a mustache?


Marpek- Crawler
- Posts : 1675
Join date : 2011-08-22
Re: LANE Boys RC's Tamiya XR311 build
![]() by laneboysrc Tue 19 Mar 2013 - 10:35
by laneboysrc Tue 19 Mar 2013 - 10:35
@Marpek: That Brat driver looks very realistic. Awesome shading on the face features!
laneboysrc- Crawler
- Posts : 877
Join date : 2012-05-21 -
Re: LANE Boys RC's Tamiya XR311 build
![]() by RTECH Tue 19 Mar 2013 - 20:14
by RTECH Tue 19 Mar 2013 - 20:14
Whereas that marpek's driver looks more like a zombie, yucks.
RTECH- Crawler
- Posts : 2376
Join date : 2011-08-22
Age : 52
Location : Hougang
Re: LANE Boys RC's Tamiya XR311 build
![]() by slow Tue 19 Mar 2013 - 20:33
by slow Tue 19 Mar 2013 - 20:33
Marpek's driver smoke too much liao.. ... ..
slow- Crawler
- Posts : 1007
Join date : 2011-08-24
Location : West Mountain
Re: LANE Boys RC's Tamiya XR311 build
![]() by laneboysrc Tue 19 Mar 2013 - 21:35
by laneboysrc Tue 19 Mar 2013 - 21:35
In the defence of Marpek, one has to look beyond the green veil to see its beauty:

(the photo was most likely taken under fluorescent light, which has a strong green color component, and the camera enhanced that even more by taking out what little was left of red light. Above is the best I could fix.).
cheers, Werner
laneboysrc- Crawler
- Posts : 877
Join date : 2012-05-21 -
Re: LANE Boys RC's Tamiya XR311 build
![]() by Marpek Wed 20 Mar 2013 - 10:30
by Marpek Wed 20 Mar 2013 - 10:30
laneboysrc wrote:Thanks for the kind words, everyone!
In the defence of Marpek, one has to look beyond the green veil to see its beauty:
(the photo was most likely taken under fluorescent light, which has a strong green color component, and the camera enhanced that even more by taking out what little was left of red light. Above is the best I could fix.).
cheers, Werner
Hi Werner,
Thanks for bringing justice to my driver...how did you do that! And also thanks for your kind words.
Marpek- Crawler
- Posts : 1675
Join date : 2011-08-22
Re: LANE Boys RC's Tamiya XR311 build
![]() by laneboysrc Wed 20 Mar 2013 - 10:42
by laneboysrc Wed 20 Mar 2013 - 10:42
Marpek wrote:
Thanks for bringing justice to my driver...how did you do that!
I used Adobe Lightroom to do white balance adjustment, plus I had to push the "hue" very much towards red as there is almost no red content in the original image.
cheers, Werner
laneboysrc- Crawler
- Posts : 877
Join date : 2012-05-21 -
Re: LANE Boys RC's Tamiya XR311 build
![]() by RTECH Wed 20 Mar 2013 - 20:15
by RTECH Wed 20 Mar 2013 - 20:15
RTECH- Crawler
- Posts : 2376
Join date : 2011-08-22
Age : 52
Location : Hougang
slow- Crawler
- Posts : 1007
Join date : 2011-08-24
Location : West Mountain
Re: LANE Boys RC's Tamiya XR311 build
![]() by Marpek Wed 20 Mar 2013 - 22:13
by Marpek Wed 20 Mar 2013 - 22:13
laneboysrc wrote:Marpek wrote:
Thanks for bringing justice to my driver...how did you do that!
I used Adobe Lightroom to do white balance adjustment, plus I had to push the "hue" very much towards red as there is almost no red content in the original image.
cheers, Werner
Wow! Thats something that I wouldnt went that far to touch up pics taken via handphone...hehe. thanks so much for sharing bro!
Marpek- Crawler
- Posts : 1675
Join date : 2011-08-22
Re: LANE Boys RC's Tamiya XR311 build
![]() by Marpek Wed 20 Mar 2013 - 22:16
by Marpek Wed 20 Mar 2013 - 22:16
RTECH wrote:Nope , still look lifeless. I still prefer Werner's driver.
Too bad then...not my problem as im sharing the figurine with bro Werner not you.
Marpek- Crawler
- Posts : 1675
Join date : 2011-08-22
First run: XR311 in Woodgrove
![]() by laneboysrc Sat 23 Mar 2013 - 16:28
by laneboysrc Sat 23 Mar 2013 - 16:28
Lovely weather this morning. I've been to Woodgrove to run the car, and make photos and a video.
Here are some shots, more can be seen in the XR311 set on Flickr.
Enjoy


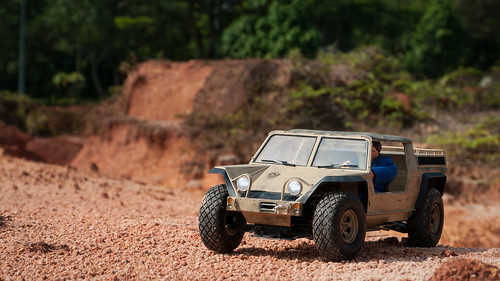


Stargek has this kit in stock. Just saying
laneboysrc- Crawler
- Posts : 877
Join date : 2012-05-21 -
Marpek- Crawler
- Posts : 1675
Join date : 2011-08-22
Page 2 of 3 • 1, 2, 3 ![]()
» LANE Boys RC's Tamiya M1025 Hummer restoration
» My secondM - LANE Boys RC M06
» [PHOTOS] LANE Boys RC's Sawback
» My thirdM - LANE Boys RC HPI Cup Racer
|
|
|