
Search
Who is online?
In total there are 6 users online :: 0 Registered, 0 Hidden and 6 Guests :: 1 BotNone
Most users ever online was 301 on Thu 21 Oct 2021 - 11:24
Latest topics
» RC Submarine: Russian Akula Class by redboat219 Tue 27 Sep 2022 - 11:43
» Land Rover Defender D90 photos and details only (picture intensive!)
by babyboy Fri 25 Jun 2021 - 16:39
» [Offroad Bashing and Rally] Offroad Bashing and Rally at Tampines Track 12 Jan 2020 - 0900hrs
by boolean21 Sat 11 Jan 2020 - 10:15
» [Scale Trail] Woodgrove Ave - Sunday 20 Oct 2019 0900hrs
by boolean21 Sat 19 Oct 2019 - 16:31
» vHOBBY RC videos
by CraftRC Fri 21 Jun 2019 - 21:32
» Suzuki Samurai 3D Printted project
by CraftRC Sat 4 May 2019 - 18:39
» WTS : Redcat Gen 7 Pro
by staypuft Mon 7 Jan 2019 - 11:31
» Hello all! Dan here
by csd8888 Fri 5 Oct 2018 - 8:27
» [Offroad Trails] Offroading at Tampines Quarry 16 Sep 2018 - 0900hrs
by boolean21 Sat 15 Sep 2018 - 18:41
» [Scale Trail] Woodgrove Ave - Sunday 12 Aug 2018 0900hrs
by boolean21 Sat 11 Aug 2018 - 22:51
» [Trail and Bash!] Woodgrove Ave - Sunday 22 Jul 2018 0900hrs
by boolean21 Sat 21 Jul 2018 - 19:39
» [Scale Trail] Woodgrove Ave - Sunday 01 Jul 2018 0900hrs
by boolean21 Sat 30 Jun 2018 - 20:39
» wts hobbywing esc + motor
by kelvintan_hc Thu 28 Jun 2018 - 15:36
» Axial roll cage crash
by CraftRC Fri 1 Jun 2018 - 20:16
» Jeep cherokee XJ crawling
by CraftRC Sat 26 May 2018 - 21:54
» Jeep cherokee XJ crawling
by CraftRC Sat 26 May 2018 - 21:54
» Extreme Rock Crawler Axial Wraith
by CraftRC Tue 8 May 2018 - 17:35
» [Scale Trail] Woodgrove Ave - Sunday 06 May 2018 0900hrs
by boolean21 Sat 5 May 2018 - 17:14
» Cab Land Rover Defender
by CraftRC Fri 4 May 2018 - 17:41
» Cab Land Rover Defender
by CraftRC Fri 4 May 2018 - 17:41
Most active topic starters
| boolean21 | ||||
| RTECH | ||||
| gionata78 | ||||
| laneboysrc | ||||
| oceanic | ||||
| Marpek | ||||
| babyboy | ||||
| Wrigleys | ||||
| ShaiAX55 | ||||
| Holdencars |
Tamiya M06 Alfa Romeo Giulia Build - Boolean21's M-chassis
+3
laneboysrc
Zax13
boolean21
7 posters
Page 1 of 1
 Tamiya M06 Alfa Romeo Giulia Build - Boolean21's M-chassis
Had been wanting to get a mini for quite some time....
and finally got it recently...
embarked on the M06 build....
this build will be going on very slowly...
bit by bit...
Pack A....

sorted out the screws.....

greased up the differentials.... using normal grease....

differentials done...

and continued with the gearbox....


and gearbox done...

that's all for now...
at least i started...


some grumbling....
first time building a tamiya kit.... compared to axial, venom.... i don't like the way tamiya packs the hardware... screws, etc....
unlike venom kits, which have all the same sized bolts, nuts, etc hardware packed together and labelled clearly... no chances of using a wrong screw or bolt..... tamiya's bolts and screws are packed together like Axial's....
Axial's manuals have the bolts and nuts' drawing at 1:1 scale and can easily place the bolt on the manual to confirm the size...
however... tamiya's manual doesn't seem to be so scale in the measurements.... maybe cos my eyesight is failing? i had to measure the bolts just to make sure...
also... tamiya bolts and screws are not hex... i had taken extra care when fastening them so as to make sure no screw heads are striped...


still prefer the hex hardwares on crawler kits...
sorry for the newbie grumbles...


and finally got it recently...
embarked on the M06 build....
this build will be going on very slowly...
bit by bit...

Pack A....

sorted out the screws.....

greased up the differentials.... using normal grease....

differentials done...

and continued with the gearbox....


and gearbox done...

that's all for now...
at least i started...


some grumbling....
first time building a tamiya kit.... compared to axial, venom.... i don't like the way tamiya packs the hardware... screws, etc....
unlike venom kits, which have all the same sized bolts, nuts, etc hardware packed together and labelled clearly... no chances of using a wrong screw or bolt..... tamiya's bolts and screws are packed together like Axial's....
Axial's manuals have the bolts and nuts' drawing at 1:1 scale and can easily place the bolt on the manual to confirm the size...
however... tamiya's manual doesn't seem to be so scale in the measurements.... maybe cos my eyesight is failing? i had to measure the bolts just to make sure...
also... tamiya bolts and screws are not hex... i had taken extra care when fastening them so as to make sure no screw heads are striped...
still prefer the hex hardwares on crawler kits...
sorry for the newbie grumbles...
 Re: Tamiya M06 Alfa Romeo Giulia Build - Boolean21's M-chassis
Good progress bro... Im excited to know what the body colour will be?

Zax13- Crawler
- Posts : 345
Join date : 2011-12-22
Location : Sengkang
 Re: Tamiya M06 Alfa Romeo Giulia Build - Boolean21's M-chassis
Great to see it coming together!
In defence to Tamiya, the M-06 is not their best kit. There are indeed a lot of different kind of screws. Other Tamiya kits are almost exclusively M3x10, which makes finding the right screws easy. Also the way some of the plastic parts around the motor and body posts come together is not well done.
Regarding the cross head screws: you need a good "PH-2" size screw driver, then no issue with stripping. The advantage is that you don't need 3 sizes of screw drivers, but then like most others I prefer hex too
The size in the manual is supposed to be 1:1. But even then the problem is that it is hard to distinguish M3x10 and M3x12, and ...
What I usually do is I open all packages and put the screws into pill boxes, one type of screw per box. I label them with the Tamiya number (e.g. M3x10 self tap is "BA6" in the M-06). Takes half an hour but makes the rest of the build so much more enjoyable. Patrick usually helps with sorting the screws
BTW: way to much grease on your gears This will slow you down
Have you decided on the color yet? Blue looks really nice!

 Re: Tamiya M06 Alfa Romeo Giulia Build - Boolean21's M-chassis
no idea about the body color yet bro.... but the blue suggested by LaneboysRC looks good!Zax13 wrote:Good progress bro... Im excited to know what the body colour will be?
ya bro, exactly.... had to measure to make sure i don't use M3x12 in place of the M3x10....laneboysrc wrote:Great to see it coming together!
In defence to Tamiya, the M-06 is not their best kit. There are indeed a lot of different kind of screws. Other Tamiya kits are almost exclusively M3x10, which makes finding the right screws easy. Also the way some of the plastic parts around the motor and body posts come together is not well done.
Regarding the cross head screws: you need a good "PH-2" size screw driver, then no issue with stripping. The advantage is that you don't need 3 sizes of screw drivers, but then like most others I prefer hex too
The size in the manual is supposed to be 1:1. But even then the problem is that it is hard to distinguish M3x10 and M3x12, and ...
What I usually do is I open all packages and put the screws into pill boxes, one type of screw per box. I label them with the Tamiya number (e.g. M3x10 self tap is "BA6" in the M-06). Takes half an hour but makes the rest of the build so much more enjoyable. Patrick usually helps with sorting the screws
nice tips... i think i have some pill boxes or similar containers laying around!
will use pill boxes or similar containers to sort out the screws instead of the magnetic tray... the tray is too small...
ya man... that's what i thought too after closing it up.... too used too filled up the whole differential gears with marine grease...laneboysrc wrote:
BTW: way to much grease on your gears This will slow you down
hope the grease runs thinner and thinner over a few runs...
for a start... slower car = lesser damage...
laneboysrc wrote:
Have you decided on the color yet? Blue looks really nice!


still yet to decide on a color....
yeah man... the blue looks good!...
 Re: Tamiya M06 Alfa Romeo Giulia Build - Boolean21's M-chassis
 Boolean, you sure your grease is not kaya? Looks like a kaya container to me. Lol..
RTECH- Crawler
- Posts : 2376
Join date : 2011-08-22
Age : 52
Location : Hougang
 Re: Tamiya M06 Alfa Romeo Giulia Build - Boolean21's M-chassis
Don't later accidentally spread on the bread.... kekeke! 


Zax13- Crawler
- Posts : 345
Join date : 2011-12-22
Location : Sengkang
 Re: Tamiya M06 Alfa Romeo Giulia Build - Boolean21's M-chassis
Zax13 wrote:Don't later accidentally spread on the bread.... kekeke!
Sometimes I also dunno why when I opened up a bucket of kaya grease at work...I started drooling abit just by looking at it!

Marpek- Crawler
- Posts : 1675
Join date : 2011-08-22
 Re: Tamiya M06 Alfa Romeo Giulia Build - Boolean21's M-chassis
Hahahaha... ya man....RTECH wrote:Boolean, you sure your grease is not kaya? Looks like a kaya container to me. Lol..
Looks like kaya!! But smell like grease...
Hahahhaa....Zax13 wrote:Don't later accidentally spread on the bread.... kekeke!
wahahahaha.... marpek.... your love for kaya is just too deep.... :SMarpek wrote:Zax13 wrote:Don't later accidentally spread on the bread.... kekeke!
Sometimes I also dunno why when I opened up a bucket of kaya grease at work...I started drooling abit just by looking at it!
 Re: Tamiya M06 Alfa Romeo Giulia Build - Boolean21's M-chassis
had a little time and continued the Mini build...
followed LaneBoysRC's tip on sorting out the hardware first.... and yes... it really helps to make the build smoother...

done up the rear... the gear box.... and mounted the silver can....


connect up the chassis.... set the wheelbase to "M" for the Alfa Romeo Giulia body....


sorted out the hardware for pack B.....

finished up the rear end with the dog bones etc....


and started on the front end....


that's all for now....


followed LaneBoysRC's tip on sorting out the hardware first.... and yes... it really helps to make the build smoother...

done up the rear... the gear box.... and mounted the silver can....


connect up the chassis.... set the wheelbase to "M" for the Alfa Romeo Giulia body....


sorted out the hardware for pack B.....

finished up the rear end with the dog bones etc....


and started on the front end....


that's all for now....


 Re: Tamiya M06 Alfa Romeo Giulia Build - Boolean21's M-chassis
Still not done? 
Build faster!


Thanks for the updates, nothing nicer than building kit with shiny, fresh parts

Build faster!
Thanks for the updates, nothing nicer than building kit with shiny, fresh parts
 Re: Tamiya M06 Alfa Romeo Giulia Build - Boolean21's M-chassis


its boolean JR's first build... hence the slow progress....
 Re: Tamiya M06 Alfa Romeo Giulia Build - Boolean21's M-chassis
I see, great to see JR building so neatly!boolean21 wrote:its boolean JR's first build... hence the slow progress....:D
Joben Tan- Crawler
- Posts : 50
Join date : 2013-08-25
 Re: Tamiya M06 Alfa Romeo Giulia Build - Boolean21's M-chassis
Master boolean, for screwing onto the tamiya plastic. It is advicable to tap it first by screwing it in , unscrew then screw in again. Doing this will prevent the screw from expanding the plastic and cause it to crack. 

RTECH- Crawler
- Posts : 2376
Join date : 2011-08-22
Age : 52
Location : Hougang
 Re: Tamiya M06 Alfa Romeo Giulia Build - Boolean21's M-chassis
thanks for the tip Master Rtech! Noted!RTECH wrote:Master boolean, for screwing onto the tamiya plastic. It is advicable to tap it first by screwing it in , unscrew then screw in again. Doing this will prevent the screw from expanding the plastic and cause it to crack.
 Re: Tamiya M06 Alfa Romeo Giulia Build - Boolean21's M-chassis
finally! Boolean JR got some time to finish up the last bit... 
dampers!


done...


battery clip in place...

i had to help to glue up the wheels...
my gluing skills are still really bad... needs more practice!

installed a random servo...
can't seem to find the faster servos that i bought for the mini and the F1.... will swap it out when the servos appear!

test fit the position of the body mounts...

trimmed and mounted the body...

good to have the holes pre-drilled... save the trouble of reaming them and risks of mistakes!
that's for now.... the JR doesn't seem to enjoy the build as much compared to legos....

 "
"
will paint it up soon once i have some idea of what colors...
thanks for looking!
keep rc-ing!!
dampers!


done...


battery clip in place...

i had to help to glue up the wheels...
my gluing skills are still really bad...

installed a random servo...
can't seem to find the faster servos that i bought for the mini and the F1.... will swap it out when the servos appear!

test fit the position of the body mounts...

trimmed and mounted the body...

good to have the holes pre-drilled... save the trouble of reaming them and risks of mistakes!
that's for now.... the JR doesn't seem to enjoy the build as much compared to legos....
will paint it up soon once i have some idea of what colors...
thanks for looking!
keep rc-ing!!
 Re: Tamiya M06 Alfa Romeo Giulia Build - Boolean21's M-chassis
Nice progress Boo...! Keep the m-chassis spirit alive!!!

Zax13- Crawler
- Posts : 345
Join date : 2011-12-22
Location : Sengkang
 Re: Tamiya M06 Alfa Romeo Giulia Build - Boolean21's M-chassis
Looking good! So another Mini-meeting coming up soon then.
 I heard blue looks great on this car

boolean21 wrote:
will paint it up soon once i have some idea of what colors...

 Re: Tamiya M06 Alfa Romeo Giulia Build - Boolean21's M-chassis
finally got some time to spend on the little M....
found a theme that i like and simple enough for rookie boo...

time to paint up the body.....
masked the windows....

first coat of paint....

after a few coats.....

as a newbie... it's my first time building a tamiya kit...
and realised i have to cut up the stickers manually...


after spending time with the scissors to trim out the stickers.... this is the output...


did up the red and green racing stripes on the hood and front bumper (no pic)

sticker numbering for the side doors... number 21!

pasted on the doors...

and here's the completed car...

finally, i have a mini to join in the fun at the hard court mini race!
thanks for looking!
found a theme that i like and simple enough for rookie boo...

time to paint up the body.....
masked the windows....

first coat of paint....

after a few coats.....

as a newbie... it's my first time building a tamiya kit...
and realised i have to cut up the stickers manually...
after spending time with the scissors to trim out the stickers.... this is the output...


did up the red and green racing stripes on the hood and front bumper (no pic)

sticker numbering for the side doors... number 21!

pasted on the doors...

and here's the completed car...

finally, i have a mini to join in the fun at the hard court mini race!
thanks for looking!
 Re: Tamiya M06 Alfa Romeo Giulia Build - Boolean21's M-chassis
Great choice! Very authentic paint scheme.
 Re: Tamiya M06 Alfa Romeo Giulia Build - Boolean21's M-chassis
Nice. I need to get my sticker on.
babyboy- Crawler
- Posts : 721
Join date : 2011-09-28
 Re: Tamiya M06 Alfa Romeo Giulia Build - Boolean21's M-chassis
thanks bro, still far from your high standards....laneboysrc wrote:Great choice! Very authentic paint scheme.
do up soon and post photos!!babyboy wrote:Nice. I need to get my sticker on.
 Re: Tamiya M06 Alfa Romeo Giulia Build - Boolean21's M-chassis
Woohoo !  finally finished !
Time for some action !
Time for some action !

RTECH- Crawler
- Posts : 2376
Join date : 2011-08-22
Age : 52
Location : Hougang
 Re: Tamiya M06 Alfa Romeo Giulia Build - Boolean21's M-chassis
RTECH wrote:Woohoo !finally finished !
Time for some action !
Yeah man!
 Re: Tamiya M06 Alfa Romeo Giulia Build - Boolean21's M-chassis
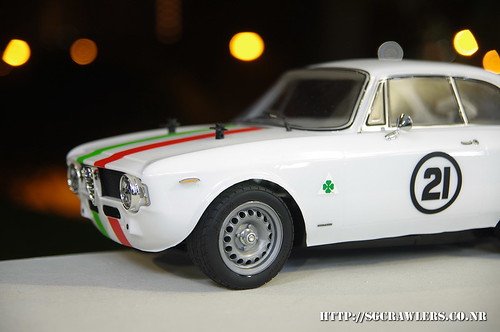
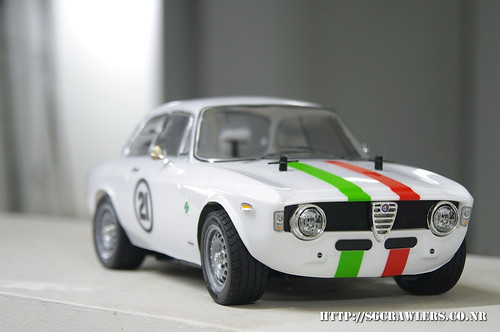
went for some void deck RC-ing and took some photos of the Alfa Romeo Giulia M-06....
thanks for looking!



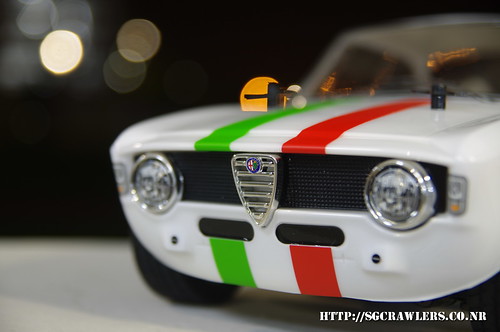

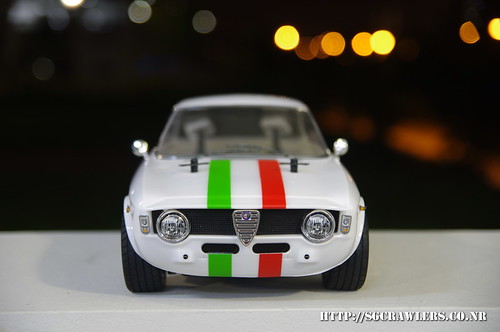
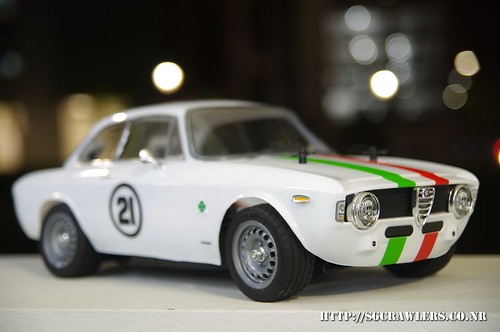
thanks for looking!


 Re: Tamiya M06 Alfa Romeo Giulia Build - Boolean21's M-chassis
Beautiful! Great composition with the out-of-focus lights!
 Re: Tamiya M06 Alfa Romeo Giulia Build - Boolean21's M-chassis
Thanks for the kinds words bro!laneboysrc wrote:Beautiful! Great composition with the out-of-focus lights!

RTECH- Crawler
- Posts : 2376
Join date : 2011-08-22
Age : 52
Location : Hougang
 Re: Tamiya M06 Alfa Romeo Giulia Build - Boolean21's M-chassis
see when boss arrange for the mini / touring meet! 
ehh.... haven't install electronics yet...


ehh.... haven't install electronics yet...
 Similar topics
» Tamiya Volkswagen Mk.1 Racing Group 2 for M-05 chassis
» Tamiya FF02 Alfa Romeo 156 Racing
» Babyboy's M - Alfa Romeo
» Zax13's M chassis build thread
» WTS: Tamiya Volkswagen Golf Mk1 Body for M-Chassis
» Tamiya FF02 Alfa Romeo 156 Racing
» Babyboy's M - Alfa Romeo
» Zax13's M chassis build thread
» WTS: Tamiya Volkswagen Golf Mk1 Body for M-Chassis
Page 1 of 1
Permissions in this forum:
You cannot reply to topics in this forum

