
Search
Who is online?
In total there are 6 users online :: 0 Registered, 0 Hidden and 6 Guests None
Most users ever online was 301 on Thu 21 Oct 2021 - 11:24
Latest topics
» RC Submarine: Russian Akula Class by redboat219 Tue 27 Sep 2022 - 11:43
» Land Rover Defender D90 photos and details only (picture intensive!)
by babyboy Fri 25 Jun 2021 - 16:39
» [Offroad Bashing and Rally] Offroad Bashing and Rally at Tampines Track 12 Jan 2020 - 0900hrs
by boolean21 Sat 11 Jan 2020 - 10:15
» [Scale Trail] Woodgrove Ave - Sunday 20 Oct 2019 0900hrs
by boolean21 Sat 19 Oct 2019 - 16:31
» vHOBBY RC videos
by CraftRC Fri 21 Jun 2019 - 21:32
» Suzuki Samurai 3D Printted project
by CraftRC Sat 4 May 2019 - 18:39
» WTS : Redcat Gen 7 Pro
by staypuft Mon 7 Jan 2019 - 11:31
» Hello all! Dan here
by csd8888 Fri 5 Oct 2018 - 8:27
» [Offroad Trails] Offroading at Tampines Quarry 16 Sep 2018 - 0900hrs
by boolean21 Sat 15 Sep 2018 - 18:41
» [Scale Trail] Woodgrove Ave - Sunday 12 Aug 2018 0900hrs
by boolean21 Sat 11 Aug 2018 - 22:51
» [Trail and Bash!] Woodgrove Ave - Sunday 22 Jul 2018 0900hrs
by boolean21 Sat 21 Jul 2018 - 19:39
» [Scale Trail] Woodgrove Ave - Sunday 01 Jul 2018 0900hrs
by boolean21 Sat 30 Jun 2018 - 20:39
» wts hobbywing esc + motor
by kelvintan_hc Thu 28 Jun 2018 - 15:36
» Axial roll cage crash
by CraftRC Fri 1 Jun 2018 - 20:16
» Jeep cherokee XJ crawling
by CraftRC Sat 26 May 2018 - 21:54
» Jeep cherokee XJ crawling
by CraftRC Sat 26 May 2018 - 21:54
» Extreme Rock Crawler Axial Wraith
by CraftRC Tue 8 May 2018 - 17:35
» [Scale Trail] Woodgrove Ave - Sunday 06 May 2018 0900hrs
by boolean21 Sat 5 May 2018 - 17:14
» Cab Land Rover Defender
by CraftRC Fri 4 May 2018 - 17:41
» Cab Land Rover Defender
by CraftRC Fri 4 May 2018 - 17:41
Most active topic starters
| boolean21 | ||||
| RTECH | ||||
| gionata78 | ||||
| laneboysrc | ||||
| oceanic | ||||
| Marpek | ||||
| babyboy | ||||
| Wrigleys | ||||
| ShaiAX55 | ||||
| Holdencars |
Need help in bodyshell spray and buildup.
5 posters
Page 1 of 1
 Need help in bodyshell spray and buildup.
Greetings,
I'm in a dire need of your assistance as who to approach regarding this situation. I've cut out my bodyshell and now, i'm kinda stuck in what to do next.
BTW, my name is Rizal and i'm a noobie in crawling.
Do whatsapp me at 98188401 as i have problems loading picture here.
I'm in a dire need of your assistance as who to approach regarding this situation. I've cut out my bodyshell and now, i'm kinda stuck in what to do next.
BTW, my name is Rizal and i'm a noobie in crawling.
Do whatsapp me at 98188401 as i have problems loading picture here.
rizal.amin.12- Crawler
- Posts : 12
Join date : 2015-02-23
 Re: Need help in bodyshell spray and buildup.
Hi Rizal,
I assume the shell is made from Lexan (Polycarbonate), i.e. it is vacuum-formed transparent plastic.
After cutting and drilling all required holes (for body mount, for accessories like roll cage or mirrors) the next step is to clean the inside of the shell, because paint is going on the inside. Use dish washing liquid and water. Let it dry thoroughly.
Then apply the window masks that usually come with the shell. Depending on the kit they may already be pre-cut, or you may need to cut them out yourself.
Then you can paint the shell on the inside using paint suitable for Polycarbonate. For example Tamiya PS paint.
Don't cheap out here; using the wrong paint will have a high chance that the paint does not stick well and falls off in large flakes the first time you drive the car.
Spray in a very well ventilated area (e.g. HDB car park). Wear a mask to protect your lungs, and rubber gloves.
Do apply very thin coats. Especially the first coat must be extremely thin to get good results. Usually I do 3 coats in total to achieve coverage, allowing 20-30 minutes of drying time between coats.
A single can of Tamiya PS is enough for a 1/10 shell.
Let the paint dry overnight and then remove the window masks carefully. Then peel off the overspray film that is on the outside of the body.
Put on the stickers. Depending on the kit they may already be pre-cut, or may need cutting with a sharp hobby knife.
For large stickers spray a thin layer of water mixed with a tiny bit of dish washing liquid where the sticker goes. Then place the sticker down and gently wipe with a towel from the middle towards the edge of the sticker, pushing air bubbles and water out to the sides.
Last step: admire your work!
There is lots of stuff on YouTube that shows all the details. Spend a few hours searching and watching videos, and you will get great results. It is very simple to do!
To get you started: https://www.youtube.com/watch?v=3wPqEqyYNRs&index=1&list=PLxIePyZxFv2uI1ays-TSURsUHPAwKRdZv
happy colouring, Werner
 Re: Need help in bodyshell spray and buildup.
Nice and detailed explanation!
Quickly start painting Rizal and join in the next trail...
Quickly start painting Rizal and join in the next trail...
 Re: Need help in bodyshell spray and buildup.
Wow..... didn't know can use water mix with a bit of dish washing is applicable for normal stickers. This is new to me. Thot only those water base sticker for tamiya display uses this method. I have been peeling the sticker and repaste again and again.... I'm doing it wrong all along.
Thanks Werner for the tips.
Thanks Werner for the tips.
babyboy- Crawler
- Posts : 721
Join date : 2011-09-28
 Re: Need help in bodyshell spray and buildup.
Very nice explanation Laneboysrc. Hope to see the finishing from Rizal here.

Zax13- Crawler
- Posts : 345
Join date : 2011-12-22
Location : Sengkang
 Re: Need help in bodyshell spray and buildup.
babyboy wrote:Wow..... didn't know can use water mix with a bit of dish washing is applicable for normal stickers. This is new to me. Thot only those water base sticker for tamiya display uses this method. I have been peeling the sticker and repaste again and again.... I'm doing it wrong all along.
Huhh?! Thought that was common knowledge
Just to clarify: With RC stickers you need to do it differently than scale model decals. The decals are "water-slide transfers" while the RC stickers are, well, stickers.
The smaller stickers you just put on the shell as is. I usually wipe the area where the sticker goes clean just before pasting the sticker to remove finger prints. Try not to touch the glue at all, for small stuff I use tweezers. After placing, press the sticker down with a piece of cloth (e.g. old T-shirt). For tiny pieces use a cotton bud.
The water / dish-washing liquid mix is only used for large area stickers. Stickers that go over a bonnet, or cover the roof, or a windshield. I use one of those spray bottles for flowers that put out a fine mist of fluid. It is important to mist the area lightly, you don't want it soaked. Then place the sticker on and align it carefully. If you done it correctly the sticker will almost float, making it easy to position. Then start rubbing it down from the centre towards the outside. You can use cloth, and/or a squeegee made from a scrap piece of Lexan. This pushes the water out to the side of the sticker; have paper towels ready to soak it up. If you get air bubbles, gently lift the sticker and reapply.
For stickers that go over corners or molded details on the shell it is useful to warm them up with a hair dryer after initial placement. This makes them stretchable to get into grooves and over sharp bends. You have to do this very gently or the sticker will melt. [I got this tip from RCGolf]
Sometimes stickers peel up after some times, on Tamiya kits especially the tiny stickers that go over sharp corners of rear lights. To get them back in shape I use ordinary white glue (PVA), spread on very thin on the underside of the sticker with an old paint brush. You will need to hold the sticker down for a few minutes before the glue starts to grip. Since white glue dries transparent, there is no issue with colour changes or other effects, even if there are lights behind the stickers.
For cars with difficult stickers it is worthwhile to study carefully where exactly they need to go before even taking them off the backing. For tough cases I make a photo copy of the stickers, cut out the copy and dry-fit it to ensure I know exactly where it goes.
Yes, that takes a lot of time. But as with most crafts: the more time you are willing to invest, the better the result gets.
 Re: Need help in bodyshell spray and buildup.
Thanks Laneboysrc. Learn new things. So you know why most of my cars are stickerless or only a few sticker other than the Subaru.

babyboy- Crawler
- Posts : 721
Join date : 2011-09-28
 Re: Need help in bodyshell spray and buildup.
All done! (Click on images to enlarge)
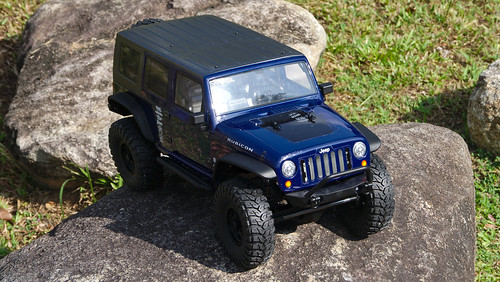
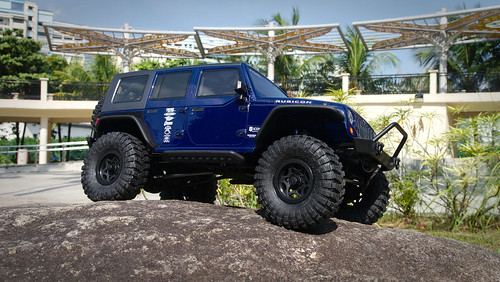
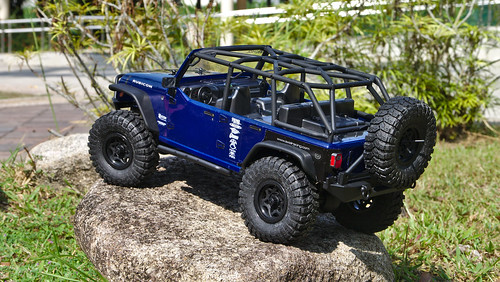
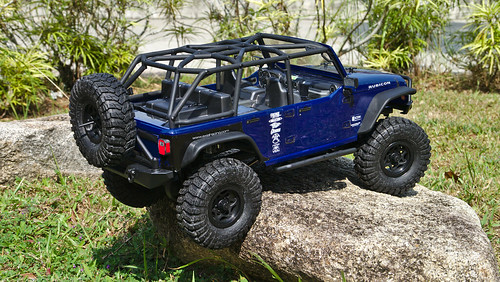
Tamiya PS4 "Blue" and PS23 "Gun Metal". The gun metal was sprayed on the outside with a thin mist of PS55 "Flat clear" for a satin finish.
More photos: https://www.flickr.com/photos/78037110@N03/sets/72157650799033590/


Tamiya PS4 "Blue" and PS23 "Gun Metal". The gun metal was sprayed on the outside with a thin mist of PS55 "Flat clear" for a satin finish.
More photos: https://www.flickr.com/photos/78037110@N03/sets/72157650799033590/
 Re: Need help in bodyshell spray and buildup.
Nice work!
Rizal... u made the right choice to outsource the paint job!...
Ready for mudding tomorrow!
Rizal... u made the right choice to outsource the paint job!...
Ready for mudding tomorrow!
 Re: Need help in bodyshell spray and buildup.
Wow.... very nice workmanship.

babyboy- Crawler
- Posts : 721
Join date : 2011-09-28
 Similar topics
» M Chassis bodyshell.
» WTS Tamiya Surface Primer For your Bodyshell Project.
» Tool Tip: Spray can handle
» Tamiya Spray Cans For Cheap Sale
» [Guide] ScaleRC4x4 spray painting guide
» WTS Tamiya Surface Primer For your Bodyshell Project.
» Tool Tip: Spray can handle
» Tamiya Spray Cans For Cheap Sale
» [Guide] ScaleRC4x4 spray painting guide
Page 1 of 1
Permissions in this forum:
You cannot reply to topics in this forum

