Search

Who is online?
In total there are 12 users online :: 0 Registered, 0 Hidden and 12 Guests None
Most users ever online was 301 on Thu 21 Oct 2021 - 11:24
Latest topics
» RC Submarine: Russian Akula Class by redboat219 Tue 27 Sep 2022 - 11:43
» Land Rover Defender D90 photos and details only (picture intensive!)
by babyboy Fri 25 Jun 2021 - 16:39
» [Offroad Bashing and Rally] Offroad Bashing and Rally at Tampines Track 12 Jan 2020 - 0900hrs
by boolean21 Sat 11 Jan 2020 - 10:15
» [Scale Trail] Woodgrove Ave - Sunday 20 Oct 2019 0900hrs
by boolean21 Sat 19 Oct 2019 - 16:31
» vHOBBY RC videos
by CraftRC Fri 21 Jun 2019 - 21:32
» Suzuki Samurai 3D Printted project
by CraftRC Sat 4 May 2019 - 18:39
» WTS : Redcat Gen 7 Pro
by staypuft Mon 7 Jan 2019 - 11:31
» Hello all! Dan here
by csd8888 Fri 5 Oct 2018 - 8:27
» [Offroad Trails] Offroading at Tampines Quarry 16 Sep 2018 - 0900hrs
by boolean21 Sat 15 Sep 2018 - 18:41
» [Scale Trail] Woodgrove Ave - Sunday 12 Aug 2018 0900hrs
by boolean21 Sat 11 Aug 2018 - 22:51
» [Trail and Bash!] Woodgrove Ave - Sunday 22 Jul 2018 0900hrs
by boolean21 Sat 21 Jul 2018 - 19:39
» [Scale Trail] Woodgrove Ave - Sunday 01 Jul 2018 0900hrs
by boolean21 Sat 30 Jun 2018 - 20:39
» wts hobbywing esc + motor
by kelvintan_hc Thu 28 Jun 2018 - 15:36
» Axial roll cage crash
by CraftRC Fri 1 Jun 2018 - 20:16
» Jeep cherokee XJ crawling
by CraftRC Sat 26 May 2018 - 21:54
» Jeep cherokee XJ crawling
by CraftRC Sat 26 May 2018 - 21:54
» Extreme Rock Crawler Axial Wraith
by CraftRC Tue 8 May 2018 - 17:35
» [Scale Trail] Woodgrove Ave - Sunday 06 May 2018 0900hrs
by boolean21 Sat 5 May 2018 - 17:14
» Cab Land Rover Defender
by CraftRC Fri 4 May 2018 - 17:41
» Cab Land Rover Defender
by CraftRC Fri 4 May 2018 - 17:41
Most active topic starters
| boolean21 | ||||
| RTECH | ||||
| gionata78 | ||||
| laneboysrc | ||||
| oceanic | ||||
| Marpek | ||||
| babyboy | ||||
| Wrigleys | ||||
| ShaiAX55 | ||||
| Holdencars |
The odds and ends of our Dingo
+3
boolean21
wyetuck88
laneboysrc
7 posters
SG Crawlers Forum :: RC Talk - Trail Trucks and Crawlers :: RC Trail Rigs and Rock Crawlers Discussion
Page 1 of 1
 The odds and ends of our Dingo
Quiet around here lately 
Ok, I know this is nothing compared to the awesome builds of many of the other members here. But one has to start small...
One thing that turned me off when I first saw the Dingo was the front area. The stickers of the grill and lights just looked wrong to me. That was definitely an area I needed to improve on ours.

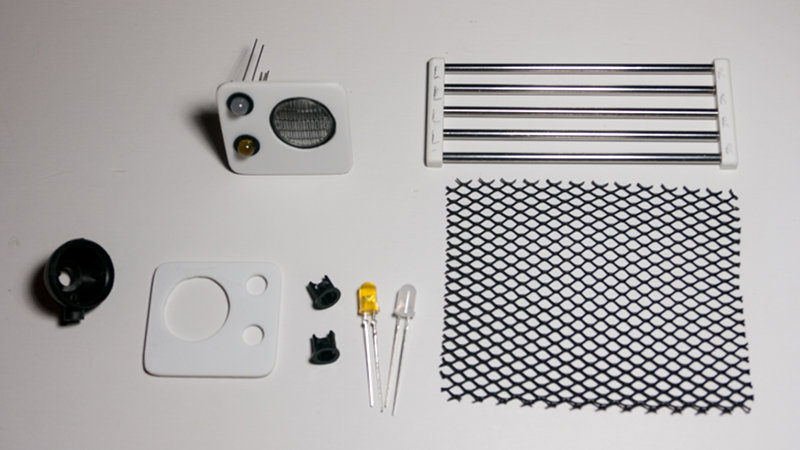
Being loosely based on a Land Rover, I went with a Land Rover design for the lights. 2 mm Styrene, a bit of cutting, sanding and drilling, and the frame was finished. The lights are from the Axial accessory light kit. First I set the light buckets flush from behind, but I felt it looked to flat. So I removed the bars from the grills that come with the light and placed them from the front. Much better.

For the grill I wanted some shiny bits. I got some 2.7 mm bars from DVD drives found in the rubbish bin in the office, which were just the right size for what I had in mind. The sides are 5x5 mm Styrene blocks, with holes drilled to hold the bars in place. The mesh is from a pencil holder for SGD 1 from Valu$.
The Styrene bits are painted with a matt black plastic spray paint I got from Jet Hobby. The inside of the light buckets is painted silver which makes them "pop" nicely.

Our Dingo is now finally ready for painting. Tomorrow evening I will start masking, then hopefully Saturday lay the colour down.
building is good -- Werner
PS: the next project is already lining up...
Ok, I know this is nothing compared to the awesome builds of many of the other members here. But one has to start small...
One thing that turned me off when I first saw the Dingo was the front area. The stickers of the grill and lights just looked wrong to me. That was definitely an area I needed to improve on ours.

Being loosely based on a Land Rover, I went with a Land Rover design for the lights. 2 mm Styrene, a bit of cutting, sanding and drilling, and the frame was finished. The lights are from the Axial accessory light kit. First I set the light buckets flush from behind, but I felt it looked to flat. So I removed the bars from the grills that come with the light and placed them from the front. Much better.

For the grill I wanted some shiny bits. I got some 2.7 mm bars from DVD drives found in the rubbish bin in the office, which were just the right size for what I had in mind. The sides are 5x5 mm Styrene blocks, with holes drilled to hold the bars in place. The mesh is from a pencil holder for SGD 1 from Valu$.
The Styrene bits are painted with a matt black plastic spray paint I got from Jet Hobby. The inside of the light buckets is painted silver which makes them "pop" nicely.

Our Dingo is now finally ready for painting. Tomorrow evening I will start masking, then hopefully Saturday lay the colour down.
building is good -- Werner
PS: the next project is already lining up...
 Re: The odds and ends of our Dingo
Nice!!! whats your next project?

wyetuck88- Crawler
- Posts : 311
Join date : 2012-05-26
 Re: The odds and ends of our Dingo
Thanks for the kind words everyone.
Another simple improvement to our stock Dingo is a moving steering wheel. Very simple to do: a tiny servo from HobbyKing is positioned behind the "instrument panel" of the body. The steering column directly plugs into the servo.
View from the bottom:


The servo is mounted on a styrene plate where two struts have been epoxy'ed on. The struts are angled in the same way the steering wheel needs to be.
View from the top:


The steering wheel comes from Axial's "Interior Detail" kit. I've shortened the included steering column drastically. At the end of the column sits a piece of a servo horn, with the horn part cut off. The servo horn is screwed into the steering column and glued for extra strength.

In the mean time the body has been masked off. Quite a job...
Tomorrow I start painting -- I hope
Another simple improvement to our stock Dingo is a moving steering wheel. Very simple to do: a tiny servo from HobbyKing is positioned behind the "instrument panel" of the body. The steering column directly plugs into the servo.
View from the bottom:


The servo is mounted on a styrene plate where two struts have been epoxy'ed on. The struts are angled in the same way the steering wheel needs to be.
View from the top:


The steering wheel comes from Axial's "Interior Detail" kit. I've shortened the included steering column drastically. At the end of the column sits a piece of a servo horn, with the horn part cut off. The servo horn is screwed into the steering column and glued for extra strength.

In the mean time the body has been masked off. Quite a job...
Tomorrow I start painting -- I hope
 Re: The odds and ends of our Dingo

RTECH- Crawler
- Posts : 2376
Join date : 2011-08-22
Age : 52
Location : Hougang
 Got some color on!
Once more thanks everyone for the kind words.
Today I got some spare time and spent it in the carpark to put some paint on:

The orange is Tamiya PS-7, the dark color is "Gun Metal" AS23 from Mumeisha (Jet Hobby). The gun metal matches almost perfectly the color of the cage -- just like I wanted to have it!
For the next lexan body I will use Mumeisha paint again. Seems to be the same quality as Tamiya, but only SGD 6.50 for 180ml, while Tamiya is SGD 10+ for only 100ml.
I am very chuffed how the paint job turned out, as artistic stuff is not my strong side. The 3 hours masking last night were well spent. The dark ring around the wheel arches will be (almost) covered up by the fenders. I made them dark so when you look from underneath (e.g. on a photo or video shoot) you will see dark, not the orange. That was something I didn't like on Axial's original Dingo photos.
Now only some clean-ups, decals on, then it's almost-a-good'en. One of the last remaining tasks is to find figures that look like Patrick and me...
Today I got some spare time and spent it in the carpark to put some paint on:

The orange is Tamiya PS-7, the dark color is "Gun Metal" AS23 from Mumeisha (Jet Hobby). The gun metal matches almost perfectly the color of the cage -- just like I wanted to have it!
For the next lexan body I will use Mumeisha paint again. Seems to be the same quality as Tamiya, but only SGD 6.50 for 180ml, while Tamiya is SGD 10+ for only 100ml.
I am very chuffed how the paint job turned out, as artistic stuff is not my strong side. The 3 hours masking last night were well spent. The dark ring around the wheel arches will be (almost) covered up by the fenders. I made them dark so when you look from underneath (e.g. on a photo or video shoot) you will see dark, not the orange.
Now only some clean-ups, decals on, then it's almost-a-good'en. One of the last remaining tasks is to find figures that look like Patrick and me...

 It's done!
All right. After an evening of trimming, screwing and gluing; a morning full of placing stickers and more gluing, it is done for now:


Now I need to hurry up with the electronics and firmware for my DIY light controller. And find some figures.
I am very happy with the outcome


Now I need to hurry up with the electronics and firmware for my DIY light controller. And find some figures.
I am very happy with the outcome
 Re: The odds and ends of our Dingo
Nice... The balloons are really the signature for your dingo. 
You using avr or pic?
You using avr or pic?
 Re: The odds and ends of our Dingo
Thanks for the nice words everyone!
I am using PIC simply because I had a few at home, including a programmer. But if I would start again I would go AVR simply because the availability of a decent C compiler.
boolean21 wrote:You using avr or pic?
I am using PIC simply because I had a few at home, including a programmer. But if I would start again I would go AVR simply because the availability of a decent C compiler.
 Got a license!
Today during lunchtime I drove down to the LTA inspection centre with our Dingo. The check was short but thorough. Everything went well and we got our license without issues.
However, since Patrick is only 5-and-a-half years old we got a "Restricted Use" license. "2006P" means that only persons who were born in 2006 and who's first name starts with "P" are allowed to drive:


On a more serious note: I made the graphics on the computer using a font named "Mandatory" (free download at DaFont.com). The plate background can be found on the LTA web site, easy to make. The edges of the "plate" and the letters are bevel-ed to make them appear "3D", since most plates in Singapore seem to have plastic letters giue'd on a plastic plate. I printed the plate, cut it out and then laminated it. Should be waterproof this way.
However, since Patrick is only 5-and-a-half years old we got a "Restricted Use" license. "2006P" means that only persons who were born in 2006 and who's first name starts with "P" are allowed to drive:


On a more serious note: I made the graphics on the computer using a font named "Mandatory" (free download at DaFont.com). The plate background can be found on the LTA web site, easy to make. The edges of the "plate" and the letters are bevel-ed to make them appear "3D", since most plates in Singapore seem to have plastic letters giue'd on a plastic plate. I printed the plate, cut it out and then laminated it. Should be waterproof this way.
 Re: The odds and ends of our Dingo
Oh no, looks like Ryan's Dingo will have problems on the road. We have not gone for any "inspection". 

RJNG- Crawler
- Posts : 99
Join date : 2011-08-29
Location : Macpherson Road
 Re: The odds and ends of our Dingo
Haha! cute!

RTECH- Crawler
- Posts : 2376
Join date : 2011-08-22
Age : 52
Location : Hougang
 A transmitter for the RC car of the figure in our Dingo
Ok, maybe I need to explain...
Our Dingo has a figure that is supposed to be Patrick. In the back of the Dingo we placed a 4cm long toy car that 1:1-Patrick found -- perfect size of 1:10 of 1:10
1:1-Patrick immediately had the idea that we need to build a matching transmitter for this RC car. So today we built this:
Click to enlarge:

Now I consider the Dingo officially finished
Our Dingo has a figure that is supposed to be Patrick. In the back of the Dingo we placed a 4cm long toy car that 1:1-Patrick found -- perfect size of 1:10 of 1:10
1:1-Patrick immediately had the idea that we need to build a matching transmitter for this RC car. So today we built this:
Click to enlarge:

Now I consider the Dingo officially finished

RTECH- Crawler
- Posts : 2376
Join date : 2011-08-22
Age : 52
Location : Hougang
 Similar topics
» Wrigleys' SCX10 Dingo Kit Build (On a budget)
» Wtb: scx10 dingo
» 3WD SCX10 Dingo.
» Axial Dingo Bumper - this?
» WTS Axial Dingo Kit BNIB
» Wtb: scx10 dingo
» 3WD SCX10 Dingo.
» Axial Dingo Bumper - this?
» WTS Axial Dingo Kit BNIB
SG Crawlers Forum :: RC Talk - Trail Trucks and Crawlers :: RC Trail Rigs and Rock Crawlers Discussion
Page 1 of 1
Permissions in this forum:
You cannot reply to topics in this forum

