
Search
Who is online?
In total there are 4 users online :: 0 Registered, 0 Hidden and 4 Guests :: 1 BotNone
Most users ever online was 301 on Thu 21 Oct 2021 - 11:24
Latest topics
» RC Submarine: Russian Akula Class by redboat219 Tue 27 Sep 2022 - 11:43
» Land Rover Defender D90 photos and details only (picture intensive!)
by babyboy Fri 25 Jun 2021 - 16:39
» [Offroad Bashing and Rally] Offroad Bashing and Rally at Tampines Track 12 Jan 2020 - 0900hrs
by boolean21 Sat 11 Jan 2020 - 10:15
» [Scale Trail] Woodgrove Ave - Sunday 20 Oct 2019 0900hrs
by boolean21 Sat 19 Oct 2019 - 16:31
» vHOBBY RC videos
by CraftRC Fri 21 Jun 2019 - 21:32
» Suzuki Samurai 3D Printted project
by CraftRC Sat 4 May 2019 - 18:39
» WTS : Redcat Gen 7 Pro
by staypuft Mon 7 Jan 2019 - 11:31
» Hello all! Dan here
by csd8888 Fri 5 Oct 2018 - 8:27
» [Offroad Trails] Offroading at Tampines Quarry 16 Sep 2018 - 0900hrs
by boolean21 Sat 15 Sep 2018 - 18:41
» [Scale Trail] Woodgrove Ave - Sunday 12 Aug 2018 0900hrs
by boolean21 Sat 11 Aug 2018 - 22:51
» [Trail and Bash!] Woodgrove Ave - Sunday 22 Jul 2018 0900hrs
by boolean21 Sat 21 Jul 2018 - 19:39
» [Scale Trail] Woodgrove Ave - Sunday 01 Jul 2018 0900hrs
by boolean21 Sat 30 Jun 2018 - 20:39
» wts hobbywing esc + motor
by kelvintan_hc Thu 28 Jun 2018 - 15:36
» Axial roll cage crash
by CraftRC Fri 1 Jun 2018 - 20:16
» Jeep cherokee XJ crawling
by CraftRC Sat 26 May 2018 - 21:54
» Jeep cherokee XJ crawling
by CraftRC Sat 26 May 2018 - 21:54
» Extreme Rock Crawler Axial Wraith
by CraftRC Tue 8 May 2018 - 17:35
» [Scale Trail] Woodgrove Ave - Sunday 06 May 2018 0900hrs
by boolean21 Sat 5 May 2018 - 17:14
» Cab Land Rover Defender
by CraftRC Fri 4 May 2018 - 17:41
» Cab Land Rover Defender
by CraftRC Fri 4 May 2018 - 17:41
Most active topic starters
| boolean21 | ||||
| RTECH | ||||
| gionata78 | ||||
| laneboysrc | ||||
| oceanic | ||||
| Marpek | ||||
| babyboy | ||||
| ShaiAX55 | ||||
| Wrigleys | ||||
| Holdencars |
LANE Boys RC's Tamiya M1025 Hummer restoration
+2
boolean21
laneboysrc
6 posters
SG Crawlers Forum :: RC Talk - Trail Trucks and Crawlers :: RC Trail Rigs and Rock Crawlers Discussion
Page 1 of 1
 LANE Boys RC's Tamiya M1025 Hummer restoration
Having finished our XR311, it is now time to get its brother, the Tamiya M1025 Hummer, back on the trail.
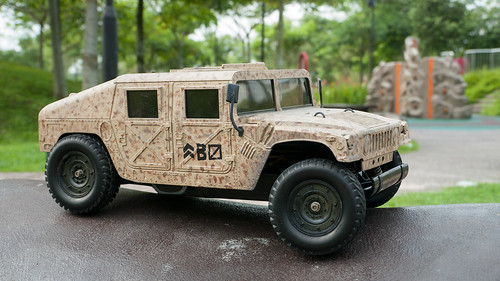
While the original paint job was very nicely done, LANE Boys Snr. is not a fan of camouflage and so the boys decided that this Hummer is going to be a white UN peace mission vehicle.
All the accessory parts like windows, roof hatch, light and air intake are screwed to the body, hence easy to remove.
The plastic parts were stripped with ordinary paint thinner, which worked surprisingly well. It was literally a matter of brushing the paint off. One can still see the decals that were applied to the car a long time ago.

The gears are still in very good condition. The ball differential is also working perfectly. Everything has been cleaned and is ready for re-installation.
The motor is an original "Johnson" motor. We will replace it with a new Mabuchi RS540SH that we have from another Tamiya kit.

All metal hardware has been cleaned and sorted. We were able to polish rust away nicely.
There are only a small number of different hardware components: most chassis screws are 3 x 10 mm self tappers, all body screws 2.6 x 10 mm. That's basically it.

The plastic parts are in a very mixed condition.

The parts on the left, which are the chassis, gear box housing, motor mount and shock towers (parts tree A and B) are in a sorry state. The plastic has hardened over the years in is extremely brittle. The parts literally break in your hands!
The hubs and carriers on the right (parts tree C) are also made from a hard plastic, but they are still strong and don't need replacement.
The parts in the middle are a soft and flexible plastic (parts tree D and E). They have survived well and will go back into the restored car.
We ordered a full set of sprues for the car anyway -- just in case.

More goodies: two pairs of shocks, new rims, a metal motor mount, and ball bearings (replacing plastic bushings).

We also ordered a gear set as we will use a gear differential both in front and the rear and keep the fragile ball diff off the trails.
Stay tuned for further progress updates!

While the original paint job was very nicely done, LANE Boys Snr. is not a fan of camouflage and so the boys decided that this Hummer is going to be a white UN peace mission vehicle.
All the accessory parts like windows, roof hatch, light and air intake are screwed to the body, hence easy to remove.
The plastic parts were stripped with ordinary paint thinner, which worked surprisingly well. It was literally a matter of brushing the paint off. One can still see the decals that were applied to the car a long time ago.

The gears are still in very good condition. The ball differential is also working perfectly. Everything has been cleaned and is ready for re-installation.
The motor is an original "Johnson" motor. We will replace it with a new Mabuchi RS540SH that we have from another Tamiya kit.

All metal hardware has been cleaned and sorted. We were able to polish rust away nicely.
There are only a small number of different hardware components: most chassis screws are 3 x 10 mm self tappers, all body screws 2.6 x 10 mm. That's basically it.

The plastic parts are in a very mixed condition.

The parts on the left, which are the chassis, gear box housing, motor mount and shock towers (parts tree A and B) are in a sorry state. The plastic has hardened over the years in is extremely brittle. The parts literally break in your hands!
The hubs and carriers on the right (parts tree C) are also made from a hard plastic, but they are still strong and don't need replacement.
The parts in the middle are a soft and flexible plastic (parts tree D and E). They have survived well and will go back into the restored car.
We ordered a full set of sprues for the car anyway -- just in case.

More goodies: two pairs of shocks, new rims, a metal motor mount, and ball bearings (replacing plastic bushings).

We also ordered a gear set as we will use a gear differential both in front and the rear and keep the fragile ball diff off the trails.
Stay tuned for further progress updates!
 Re: LANE Boys RC's Tamiya M1025 Hummer restoration
neat and tidy work..
looking forward to updates!
subscribed!
looking forward to updates!
subscribed!
 Re: LANE Boys RC's Tamiya M1025 Hummer restoration
Looking forward to your marvelous work... 

Zax13- Crawler
- Posts : 345
Join date : 2011-12-22
Location : Sengkang
 Re: LANE Boys RC's Tamiya M1025 Hummer restoration
With tamiya's super detailed humvee, plus your super detailed handy work... we cant wait to see it roll! 

Marpek- Crawler
- Posts : 1675
Join date : 2011-08-22
 Re: LANE Boys RC's Tamiya M1025 Hummer restoration
Thanks guys 
This will be a quick job though, I will not do any modifications.
The body shell needs a few holes closed that have grown over the years And it is missing the front tow plate with the D-shackles; I'll have to re-create it as good as I can in styrene.
This will be a quick job though, I will not do any modifications.
The body shell needs a few holes closed that have grown over the years
 Part 2 - Body work
With all parts stripped and cleaned, it is now time to build the vehicle up again. First we were dealing with the body.

Our Hummer body was in a good condition given its use and age, but on the front there was the tow plate missing.
To create a replacement we extracted the front view of the vehicle from the user manual and scaled it to exact size of the body on the computer before printing. I then cut it out from paper and glued it on a piece of styrene as cutting reference.

A support plate was cut from 1mm styrene that holds the tow plate to the body. Since this piece will not be seen it was cut rather quick and dirty.
The shackle mounts are from a scrap piece of plastic that had holes already drilled into it. The shackles are 3 mm D-shackles from a local hardware store.
(thanks Babyboy for the source ).
).

The finished tow plate mounted onto the body. Looks close to original.

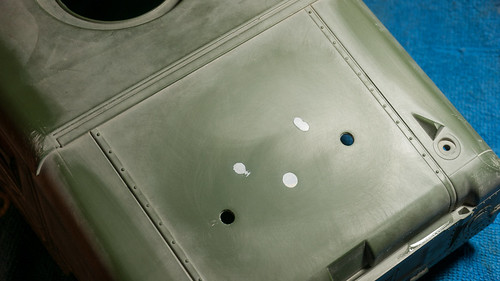
The back of the car had three holes that needed filling. It was quite tricky to do to get a decent finish.
We managed to obtain a new sprue of body parts on eBay which included all front lights, the top hatch as well as the air intake. We only used the front lights which were quite damaged on our body.

Ready to paint. With all accessories in place the first job was to spray the inside with flat black.

The body has been primed and painted with Tamiya Matt White TS-27.

The paint turned out ok but far from perfect as I rushed too much. Now it is a matter of highlighting all those awesome body details.

Despite spending a large amount of time to close three holes on the back of the body, they are still visible.
I think that the Tamiya Basic Putty that I used is just not the right thing for the job as it affects the styrene. Or more likely: I am just doing it wrong.

The rims were brand new and turned out flawlessly.

Up next: rebuilding the chassis!

Our Hummer body was in a good condition given its use and age, but on the front there was the tow plate missing.
To create a replacement we extracted the front view of the vehicle from the user manual and scaled it to exact size of the body on the computer before printing. I then cut it out from paper and glued it on a piece of styrene as cutting reference.

A support plate was cut from 1mm styrene that holds the tow plate to the body. Since this piece will not be seen it was cut rather quick and dirty.
The shackle mounts are from a scrap piece of plastic that had holes already drilled into it. The shackles are 3 mm D-shackles from a local hardware store.
(thanks Babyboy for the source

The finished tow plate mounted onto the body. Looks close to original.

The back of the car had three holes that needed filling. It was quite tricky to do to get a decent finish.

We managed to obtain a new sprue of body parts on eBay which included all front lights, the top hatch as well as the air intake. We only used the front lights which were quite damaged on our body.

Ready to paint. With all accessories in place the first job was to spray the inside with flat black.

The body has been primed and painted with Tamiya Matt White TS-27.

The paint turned out ok but far from perfect as I rushed too much. Now it is a matter of highlighting all those awesome body details.

Despite spending a large amount of time to close three holes on the back of the body, they are still visible.
I think that the Tamiya Basic Putty that I used is just not the right thing for the job as it affects the styrene. Or more likely: I am just doing it wrong.

The rims were brand new and turned out flawlessly.

Up next: rebuilding the chassis!
 Re: LANE Boys RC's Tamiya M1025 Hummer restoration
Im drooling..... 

Marpek- Crawler
- Posts : 1675
Join date : 2011-08-22
 Re: LANE Boys RC's Tamiya M1025 Hummer restoration
to improve the performance of the vehicle in trails, you might wanna consider doing limited slip diffs. i see that your diff gears are the same as TT-01/TL-01's, its easy to do.
all you need are HPI's differential tuning springs from the Cup Racer, and a drillbit for drilling out the centre of the spider gear mount.
all you need are HPI's differential tuning springs from the Cup Racer, and a drillbit for drilling out the centre of the spider gear mount.

qks57- Crawler
- Posts : 309
Join date : 2011-08-23
Age : 35
Location : Bukit Gombak
 Re: LANE Boys RC's Tamiya M1025 Hummer restoration
qks57 wrote:to improve the performance of the vehicle in trails, you might wanna consider doing limited slip diffs. i see that your diff gears are the same as TT-01/TL-01's, its easy to do.
all you need are HPI's differential tuning springs from the Cup Racer, and a drillbit for drilling out the centre of the spider gear mount.
Thanks for the tip. In the Cup Racer the spring presses on the small spider gears. I assume when doing the mod for the Tamiya diff one has to put the springs on the larger bevel gears on the out drives -- because the small spiders in the Tamiya gear are 120 degrees apart, not 180 degrees as in the Cup Racer so getting the spring in there would be very hard.
cheers, Werner
 Part 3 - Chassis
With the body in good shape it was time to rebuild the chassis of our Tamiya M1025 Hummer. Like all Tamiya kits one begins with the differentials.

The original kit contained a ball differential for the back and a gear differential for the front wheel.
For better durability on the trail we replaced the rear diff with a locked gear differential and bought a second gear differential for the front.
The following photo shows the ball differential (known as Manta Ray ball diff) on the left, and the (locked) gear diff on the right.

To lock the gear diff we used the locking plastic parts from a CC-01 gear set that we had spare. The inside gears are identical between the TA01 and the CC-01, but the outer gear is much larger on the CC-01.
With the diffs built next was assembly of the rear gear box. The housing is new as the original was so brittle that it brakes apart upon touching.

We used a GPM Racing metal motor mount to hold the Mabuchi RS-540SH we salvaged from another Tamiya kit that we upgraded to brushless.

The large gear in the next photo is basically the spur gear, which also drives the bevel gear that brings power to the front axle. The smaller idler gear is identical front and rear.

The rear gearbox has been closed up and the upper suspension arms have been mounted.

Next up is the rear suspension. All parts were re-used from the original car.

With the suspension attached to the gearbox it is ready to connect to the chassis.
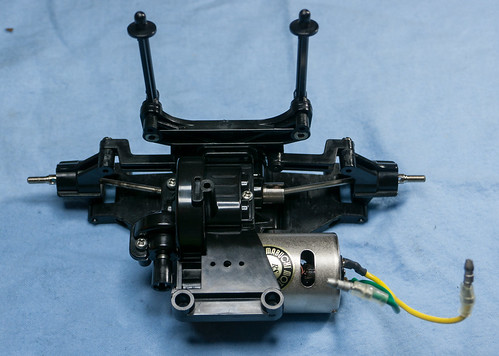
The front gearbox is simpler than the rear. The new gear differential was installed.
Notice that the out-drives here in the front have a ring serving as identification marker, while the rear out-drives don't have this marker. The out-drives are different front and rear, so it is important to pay attention to this.

The idler and bevel gears are greased up and installed, ready to close the gearbox.

A new front shock tower has been installed together with the original suspension upper arms.

Like in the back we re-used all original parts of the suspension as they were in good condition. The only difference is that we upgraded the plastic bushings to ball bearings throughout the vehicle.

In contrast to the rest of the suspension, the front lower arms are mounted with this U-shaped metal rod instead of special pin-screws.

With both axles being assembled the brand new chassis got the electronics installed.
We had an original Tamiya Servo TSU-03 lying around, perfect for this car. The ESC is an old TEU-101BK that had shoddy wiring, which got replaced. Since the TEU-101BK does not have a BEC I added a UBEC between the ESC/Receiver and battery compartment.
All wires were trimmed to the correct size to keep it compact and neat.

Next up is the steering assembly. It is a simple bell crank with a metal bar between the pivots. The pivots hinge on simple step screws.

The steering is very compact and low as the chassis has buggy origins.

The rear axle and gearbox gets bolted onto the chassis with four screws.

The front gearbox bolts on in a similar fashion but has an one more screw holding it to the chassis. Note the thin drive shaft towards the front.

The horizontal bar above the shock tower is the front body mount. The body has two hooks that go under that bar. The front bumper captures the U-shaped suspension hinge pin.

Bottom view of the completed chassis. The last thing to do is soldering the motor wires.

The completed chassis with battery installed. Looks like new, smells like new, drives like new.

I am really pleased how it turned out. A test drive at home showed that it runs very smooth and quiet.
The chassis was extremely easy to build compared to other Tamiya kits like the DB-01 or M-06. Almost all screws on the chassis are 3 x 10 mm self tapping screws, unlike more modern kit that use a large diversity of machine screws and self tapping screws.
Now only the detailing and finishing touches are left.

The original kit contained a ball differential for the back and a gear differential for the front wheel.
For better durability on the trail we replaced the rear diff with a locked gear differential and bought a second gear differential for the front.
The following photo shows the ball differential (known as Manta Ray ball diff) on the left, and the (locked) gear diff on the right.

To lock the gear diff we used the locking plastic parts from a CC-01 gear set that we had spare. The inside gears are identical between the TA01 and the CC-01, but the outer gear is much larger on the CC-01.
With the diffs built next was assembly of the rear gear box. The housing is new as the original was so brittle that it brakes apart upon touching.

We used a GPM Racing metal motor mount to hold the Mabuchi RS-540SH we salvaged from another Tamiya kit that we upgraded to brushless.

The large gear in the next photo is basically the spur gear, which also drives the bevel gear that brings power to the front axle. The smaller idler gear is identical front and rear.

The rear gearbox has been closed up and the upper suspension arms have been mounted.

Next up is the rear suspension. All parts were re-used from the original car.

With the suspension attached to the gearbox it is ready to connect to the chassis.

The front gearbox is simpler than the rear. The new gear differential was installed.
Notice that the out-drives here in the front have a ring serving as identification marker, while the rear out-drives don't have this marker. The out-drives are different front and rear, so it is important to pay attention to this.

The idler and bevel gears are greased up and installed, ready to close the gearbox.

A new front shock tower has been installed together with the original suspension upper arms.

Like in the back we re-used all original parts of the suspension as they were in good condition. The only difference is that we upgraded the plastic bushings to ball bearings throughout the vehicle.

In contrast to the rest of the suspension, the front lower arms are mounted with this U-shaped metal rod instead of special pin-screws.

With both axles being assembled the brand new chassis got the electronics installed.
We had an original Tamiya Servo TSU-03 lying around, perfect for this car. The ESC is an old TEU-101BK that had shoddy wiring, which got replaced. Since the TEU-101BK does not have a BEC I added a UBEC between the ESC/Receiver and battery compartment.
All wires were trimmed to the correct size to keep it compact and neat.

Next up is the steering assembly. It is a simple bell crank with a metal bar between the pivots. The pivots hinge on simple step screws.

The steering is very compact and low as the chassis has buggy origins.

The rear axle and gearbox gets bolted onto the chassis with four screws.

The front gearbox bolts on in a similar fashion but has an one more screw holding it to the chassis. Note the thin drive shaft towards the front.

The horizontal bar above the shock tower is the front body mount. The body has two hooks that go under that bar. The front bumper captures the U-shaped suspension hinge pin.

Bottom view of the completed chassis. The last thing to do is soldering the motor wires.

The completed chassis with battery installed. Looks like new, smells like new, drives like new.

I am really pleased how it turned out. A test drive at home showed that it runs very smooth and quiet.
The chassis was extremely easy to build compared to other Tamiya kits like the DB-01 or M-06. Almost all screws on the chassis are 3 x 10 mm self tapping screws, unlike more modern kit that use a large diversity of machine screws and self tapping screws.
Now only the detailing and finishing touches are left.
 The Hummer is running once again
It's actually ready since three weeks, but today finally I had time to make photos of the finished car.

We found the original decal sheet on eBay for a low price, so we put on the original stickers. There are not many of them anyway.

The headlamps, tail lights, indicators and UN signs were kindly made by the resident Johannes Gutenberg (thanks Boo! ). We made the lamps based on reference photos found on the Internet.
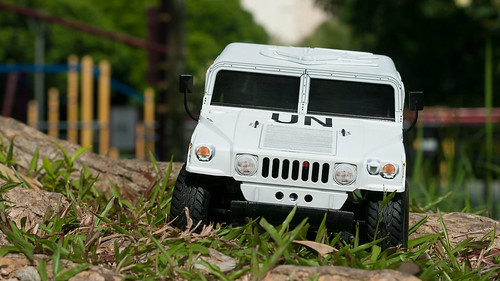
Small details like the reflectors as well as the engine cover retainers were painted with a brush. Working on those fiddly details is very relaxing and ideal for those rainy evenings.

One of the biggest concerns was to show off the details on this nice Tamiya hard-plastic shell. The solution was simple: We traced all recesses gently with a sharp pencil and then sealed the body with flat clear spray paint. It makes all the small rivets, recesses and panel lines stick out nicely without drawing attention to it.

When putting the body on the chassis for the first time we realized that there was simply not enough space for the D-shackle mount we had built. So sadly we removed them.

The mud flaps came from a damaged toy digger. There is one detail still missing: windscreen wipers!

The UN Peace Mission Hummer will be riding the trails of Singapore once more!
Maiden run tomorrow in Woodgrove!
PS: After taking the photos in our local park Patrick took the car for a spin. A while later he came back with the car in his hands: it didn't move anymore. The drive train was blocked.
At home I found out that a washer had fallen into the motor, attracted by the magnet. The washer jammed the rotor and also cut some of the windings. The motor is toast: it still worked but gets hot immediately as some windings are shorted out and draw a lot of current. It also acts as a constant drag brake
Luckily we had a spare silver can around.
Lesson learned: keep motors neatly stored in separate packaging, not in the junk bin together with small metal parts.

We found the original decal sheet on eBay for a low price, so we put on the original stickers. There are not many of them anyway.

The headlamps, tail lights, indicators and UN signs were kindly made by the resident Johannes Gutenberg (thanks Boo!

Small details like the reflectors as well as the engine cover retainers were painted with a brush. Working on those fiddly details is very relaxing and ideal for those rainy evenings.

One of the biggest concerns was to show off the details on this nice Tamiya hard-plastic shell. The solution was simple: We traced all recesses gently with a sharp pencil and then sealed the body with flat clear spray paint. It makes all the small rivets, recesses and panel lines stick out nicely without drawing attention to it.

When putting the body on the chassis for the first time we realized that there was simply not enough space for the D-shackle mount we had built. So sadly we removed them.

The mud flaps came from a damaged toy digger. There is one detail still missing: windscreen wipers!

The UN Peace Mission Hummer
Maiden run tomorrow in Woodgrove!
PS: After taking the photos in our local park Patrick took the car for a spin. A while later he came back with the car in his hands: it didn't move anymore. The drive train was blocked.

At home I found out that a washer had fallen into the motor, attracted by the magnet. The washer jammed the rotor and also cut some of the windings. The motor is toast: it still worked but gets hot immediately as some windings are shorted out and draw a lot of current. It also acts as a constant drag brake
Luckily we had a spare silver can around.
Lesson learned: keep motors neatly stored in separate packaging, not in the junk bin together with small metal parts.
 Re: LANE Boys RC's Tamiya M1025 Hummer restoration
nice updates!
great details!...
i see that there are so many rivets and details to go through with the pencil!!
great details!...
i see that there are so many rivets and details to go through with the pencil!!
 Similar topics
» LANE Boys RC's Tamiya XR311 build
» Tamiya M1025 Hummer from 1995
» My secondM - LANE Boys RC M06
» My thirdM - LANE Boys RC HPI Cup Racer
» [PHOTOS] LANE Boys RC's Sawback
» Tamiya M1025 Hummer from 1995
» My secondM - LANE Boys RC M06
» My thirdM - LANE Boys RC HPI Cup Racer
» [PHOTOS] LANE Boys RC's Sawback
SG Crawlers Forum :: RC Talk - Trail Trucks and Crawlers :: RC Trail Rigs and Rock Crawlers Discussion
Page 1 of 1
Permissions in this forum:
You cannot reply to topics in this forum

